How to Use Matte Eyeshadow for Hooded Eyes

Many of the most popular makeup tutorials don't work for hooded eyes, and that can feel discouraging. But creating a stunning, defined eye look isn't out of reach; it just requires a different approach. The key is to forget everything you’ve learned about placing color in your natural crease. Instead, you’ll learn to create a new, higher crease that’s always visible. This simple shift in placement is a complete game-changer. This guide is your masterclass in using matte eyeshadow for hooded eyes, showing you how to choose the right colors, apply them for maximum lift, and blend them seamlessly for a sophisticated finish that enhances your unique eye shape.
Key Takeaways
- Prioritize matte eyeshadows to sculpt your eyes: Matte formulas absorb light, which allows you to create the illusion of depth and define a new crease without highlighting the skin on your brow bone.
- Apply crease color above your natural fold: To ensure your eyeshadow is visible when your eyes are open, place your defining shades slightly higher than your natural socket and blend the color up and out toward the tail of your brow for a lifting effect.
- Use liner and mascara to open up the eye: Keep eyeliner thin and focused on the outer third of your eye to avoid closing it off. Finish by curling your lashes and applying mascara to create as much upward lift as possible.
What Are Hooded Eyes?
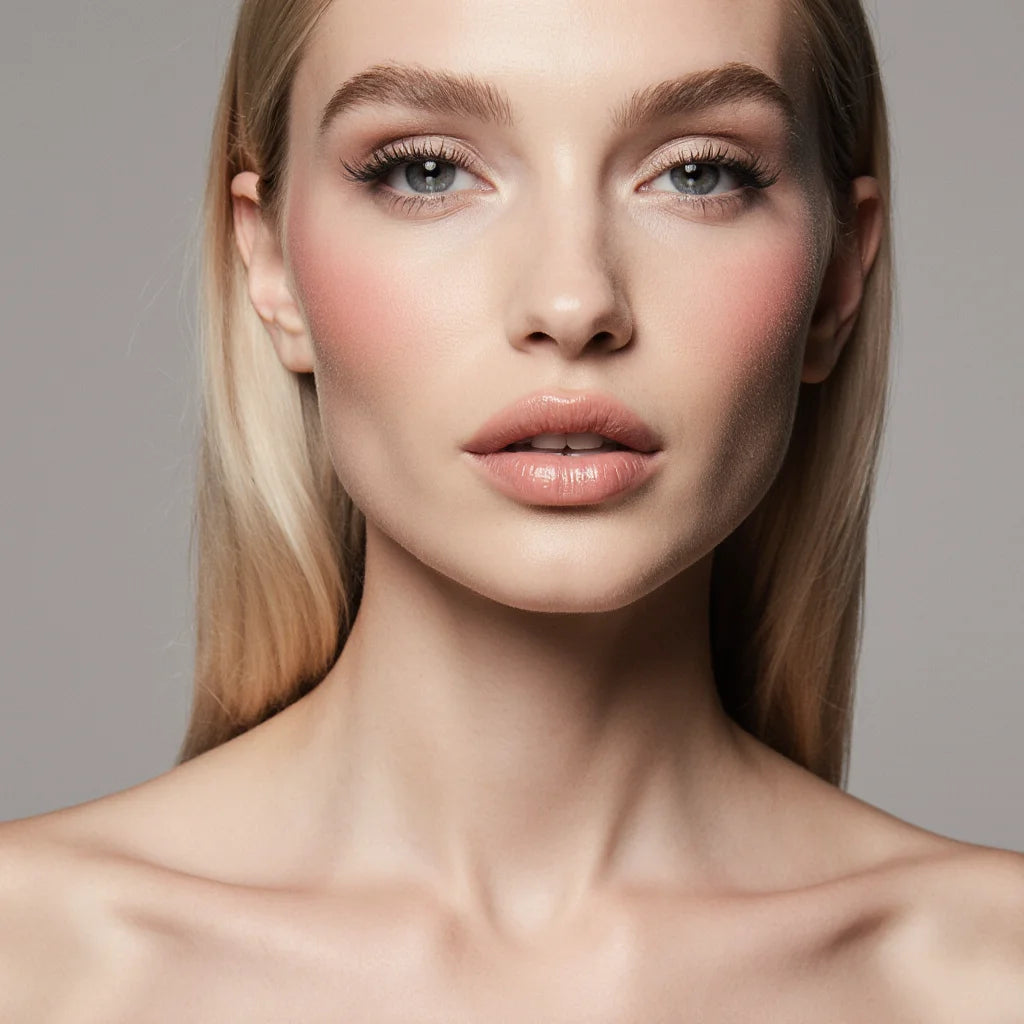
Ever apply a beautiful eyeshadow look, only to have it disappear the moment you open your eyes? If that sounds familiar, you likely have hooded eyes. This common and gorgeous eye shape is defined by a small flap of skin under each eyebrow that partially or fully covers the mobile eyelid. This "hood" means your crease isn't always visible, which can make your lid space appear smaller.
Many people have hooded eyes from birth, while others develop them as they age and the skin loses some of its elasticity. Celebrities like Jennifer Lawrence, Blake Lively, and Taylor Swift all have hooded eyes and are masters at using makeup to accentuate their features. Having hooded eyes doesn’t mean you can't create stunning looks; it just means you get to learn a few clever techniques to make your eyes the center of attention. It's not about "fixing" anything, but rather about understanding the unique canvas you're working with. The goal is to create dimension and lift right where you want it, making your eyes appear larger and more defined. The key is learning how to work with your unique shape to create the illusion of depth and space, which is exactly where the magic of matte eyeshadow comes in.
How to Tell If You Have Them
Not sure if this is your eye shape? It’s easy to figure out. Stand in front of a mirror and look straight ahead, keeping your eyes relaxed and open as you normally would. Now, look at your upper eyelid. Can you see a defined crease? If the skin below your brow bone covers most or all of your mobile eyelid, you have hooded eyes. A key indicator, as Vogue notes, is that "the natural crease isn’t fully visible when the eyes are open." It’s that simple.
Hooded Eyes vs. Other Eye Shapes
What makes hooded eyes different from, say, round or almond eyes is that prominent fold of skin. With other eye shapes, the mobile lid and crease are typically visible when the eye is open, creating a clear canvas for shadow and liner. With hooded eyes, that canvas is partially hidden. This is why some popular makeup tutorials might not give you the results you want. Techniques that rely on a visible crease can get lost. As makeup artists have pointed out, "heavy dark shades across the entire lid, thick eyeliner, and dramatic cut creases can weigh hooded eyes down." Instead, the goal is to use strategic placement and the right formulas, like our versatile eye makeup, to create lift and definition.
Why Is Matte Eyeshadow Best for Hooded Eyes?
If you have hooded eyes, you know that finding the right makeup technique can feel like a game-changer. The goal is to create the illusion of more lid space and a defined crease, essentially lifting the eye area. This is where matte eyeshadow truly shines, or rather, doesn't. Unlike their shimmery counterparts, matte formulas absorb light instead of reflecting it. This simple quality is the secret to sculpting and defining your eye shape without drawing attention to the skin that folds over the eyelid.
Think of it like contouring for your face. You use matte powders to create shadows that recede, like under your cheekbones, and highlighters to bring features forward. The same principle applies to your eyes. A well-placed matte shadow can create a new, higher crease, making your eyes appear larger and more open. It’s all about playing with light and shadow to enhance your natural features. Using the right eye makeup allows you to build depth and dimension exactly where you want it, giving you complete control over your final look.
Why Matte Beats Shimmer
When you have hooded eyes, shimmer and glitter formulas can be tricky. Because they reflect light, they bring surfaces forward and highlight texture. Applying a shimmery shadow over your mobile lid and up toward your brow bone can actually emphasize the hooded part of your eye, making it look puffier or more prominent. It’s a beautiful finish, but it often works against the goal of creating depth.
Matte eyeshadows, on the other hand, are your best friend. They do the opposite by absorbing light, which creates the illusion of shadow and depth. This allows you to strategically place color to fake a deeper, more defined crease that’s visible when your eyes are open. A soft, neutral matte from a palette like Enrapture can make the brow bone recede just enough to let your lid space be the star of the show.
How to Create Definition Without the Weight
The beauty of matte eyeshadow is its ability to build soft, believable definition. Dark, heavy colors applied all over can make hooded eyes appear smaller and weighed down. Matte formulas, however, are often finely milled and buildable, allowing you to apply sheer layers of color and blend them out for a seamless, diffused look. This technique lets you add structure and shape without any harsh lines.
You can create a subtle contour that looks completely natural, much like how a soft matte blush can gently sculpt your cheekbones. The key is to create a gradient of color that adds dimension without looking heavy. This approach ensures your eyes look lifted, open, and defined, enhancing their natural beauty in a soft and sophisticated way.
The Best Matte Eyeshadow Colors for Hooded Eyes
Choosing the right eyeshadow colors can completely change how your hooded eyes look. The goal isn't to hide your eye shape but to enhance it by creating dimension and the illusion of more space. With hooded eyes, the skin on the brow bone tends to cover the mobile lid, so we need to use color strategically to bring depth back and create a lifting effect. Matte eyeshadows are perfect for this because they absorb light, allowing you to sculpt and define the eye area without adding any distracting shine. By focusing on specific color families, you can make your eyes appear larger, more open, and beautifully defined. It’s all about using light and shadow to your advantage.
Flattering Neutrals and Browns
When in doubt, reach for neutrals. Soft beiges, creamy taupes, and a range of browns are your secret weapons for hooded eyes. These shades are incredible for creating a natural-looking contour just above your actual crease, which helps the brow bone recede and your lid come forward. Think of it as subtle sculpting for your eyes. A light matte beige can work as a base, while a medium brown can define the new "crease" you're creating. Our eye makeup collection is filled with versatile nude and brown shades that are perfect for building these looks. They add just enough depth to make your eyes pop without looking heavy.
Cool Tones That Create a Lift
While warm browns are gorgeous, don't overlook the power of cool-toned neutrals. Shades like soft mauve, dusty rose, and slate gray can work wonders for hooded eyes. These colors provide a beautiful contrast that can make the whites of your eyes appear brighter and more awake. A cool-toned taupe or gray blended into the outer corner and slightly above the crease can create a subtle shadow that gives the eye a lifted appearance. According to makeup artists, this technique helps to sculpt the eye area effectively. These shades are sophisticated and a great way to switch up your look while still keeping it natural and refined.
Shades to Skip
Just as important as knowing which colors to use is knowing which ones to approach with caution. For hooded eyes, it's best to avoid applying very dark, heavy shades like black or charcoal all over your mobile lid. When placed too low, these colors can make the eye look smaller and more closed off. The key is strategic placement. Instead of a heavy application, use these darker shades sparingly as a liner or to add a touch of definition to the outermost corner of your eye. The goal is to lift and open, and overly dark colors applied broadly can have the opposite effect, weighing the eye down.
Gather Your Tools and Prep Your Eyes
Before you even think about picking up an eyeshadow, let's talk about prep work. The right tools and a properly prepared canvas are the secrets to a flawless, long-lasting look, especially when working with hooded eyes. Taking a few extra moments here will make your application smoother and ensure your hard work doesn't disappear or crease an hour later. Think of it as building a strong foundation for your artistry.
Choose the Right Brushes
You don’t need a dozen brushes, but having a few key players will completely change your makeup game. High-quality brushes give you superior control and blend colors seamlessly, which prevents a muddy or patchy finish. For hooded eyes, I recommend starting with three essentials: a fluffy blending brush to diffuse harsh lines, a smaller, denser brush to pack on color with precision, and a small pencil brush for detailed work along the lash line or in the outer corner. These specific tools help you place pigment exactly where you want it, which is absolutely crucial for creating definition and lift on a smaller visible lid space.
How to Prime Your Lids
If you have hooded eyes, eyeshadow primer is your best friend. It's a non-negotiable step. Because the skin on your brow bone can rest on your lid, it creates the perfect environment for creasing and color transfer throughout the day. A good primer creates a smooth, slightly tacky base that grips onto your eyeshadow, keeping it vibrant and in place for hours. Just a thin layer applied from your lash line all the way up to your brow bone is all you need to ensure your beautiful eye makeup looks just as fresh at the end of the day as it did in the morning.
Find Your Crease (Hint: It's Higher Than You Think)
Here’s the most important trick for hooded eyes: you need to create a new, higher crease. Your natural crease is likely hidden when your eyes are open, so applying shadow there means the color will completely vanish. To find the right placement, look straight ahead into a mirror with your eyes relaxed and open. Your new crease is the area just above your natural fold that remains visible. This is where you’ll apply your transition and definition shades. This technique creates the illusion of depth and a more open, lifted eye, ensuring your hard work is always on display.
How to Apply Matte Eyeshadow: A Step-by-Step Guide
Ready to create a gorgeous, lifted look? This simple, three-step process is designed to enhance hooded eyes by creating depth and dimension exactly where you need it. Grab your favorite matte shadows and let’s get started.
Step 1: Build a Visible Base Color
First, you need to create a smooth and even canvas. Applying a base color across your entire lid, from the lash line up to the brow bone, will neutralize any discoloration and give your other shadows something to grip. For hooded eyes, neutral matte eyeshadows in soft beiges and taupes are especially effective. These shades add a subtle, natural depth without overwhelming your lid space. Think of this step as laying down a solid foundation that makes blending the next layers a breeze.
Step 2: Create Definition in the Socket
Now it’s time to add definition. The goal here is to create a new, higher crease that remains visible when your eyes are open. Using a slightly darker matte shade, focus the color on the outer corner of your eye, sweeping it slightly above your natural socket line. The key is to keep the depth concentrated on the outer third of the eye. This technique helps create an open, lifted appearance instead of closing the eye off. Use a fluffy blending brush to soften the edges for a seamless transition.
Step 3: Use Strategic Placement to Create a Lift
The final step is all about creating the illusion of lift. This is where placement becomes so important. Instead of applying your darkest contour shade directly in your natural crease (which can disappear when you open your eyes), you should apply colors slightly above the crease. Look straight into the mirror with your eyes relaxed and open, and place the shadow where you want your new crease to be. This simple adjustment makes a huge difference, making your eyes appear larger and more awake.
Blending Techniques for a Lifted Look
Once your eyeshadow is in place, blending is what brings the whole look together. For hooded eyes, the right blending technique does more than just soften lines; it creates the illusion of depth and lift, making your eyes appear more open and awake. It’s all about being strategic with your brush strokes to work with your unique eye shape, not against it. These techniques will help you achieve a seamless, lifted look every time.
How to Work With Limited Lid Space
When you have hooded eyes, your mobile lid space can seem to disappear when your eyes are open. This is why eyeshadow placement is so important. To make your eyes pop, you need to create a new, higher crease. Apply your transition and contour shades slightly above your natural socket line, focusing the color on the area that remains visible when you look straight ahead. Using smaller, denser brushes for placement and a fluffier brush for blending gives you more control over your eye makeup application, ensuring the colors don’t get lost in the fold.
Create a Smooth Transition (No Muddy Colors Here)
A smooth gradient of color is key to a professional-looking finish. To avoid a muddy mess, always start with the lightest shade and gradually build up to the darkest. Use a clean, fluffy blending brush to gently diffuse the edges of each color, using small circular motions and light, back-and-forth sweeping motions. To keep the look open and bright, concentrate the deepest shades on the outer third of your eye. This technique of keeping depth focused on the outer corners helps maintain a lifted appearance and prevents the lid from looking heavy.
Angle Darker Shades Upward to Lift the Eye
This is the ultimate trick for faking a lifted eye. Instead of following the natural curve of your eye downwards, blend your darkest eyeshadow up and out toward the tail of your eyebrow. Imagine drawing a soft, angled line from the outer corner of your lash line towards your temple. This upward angle visually pulls everything up, counteracting any natural droopiness in the eye area. You can use a small, angled brush for more precision. This simple change in direction makes a huge difference and is one of the most effective ways to flatter hooded eyes.
Common Mistakes to Avoid
Working with hooded eyes has a bit of a learning curve, but once you understand the unique canvas you’re working with, it becomes so much easier. Often, the techniques we see demonstrated for other eye shapes just don’t translate. If you’ve ever felt like your eyeshadow disappears or makes your eyes look smaller, you might be making one of a few common mistakes. The good news is that these are incredibly easy to fix.
A few simple adjustments to your technique can completely change your makeup game. It’s not about overhauling your entire routine; it’s about making small, strategic changes to placement, blending, and the amount of product you use. Let’s walk through the most frequent slip-ups and how to correct them for a beautiful, lifted look every time.
Placing Shadow Too Low
This is probably the most common mistake. When you have hooded eyes, placing your crease color in your actual crease means it will disappear the moment you open your eyes. The skin from the brow bone folds over and hides all your hard work. This can also drag the eye down, making it appear smaller and heavier.
The fix is simple: create a new, higher crease. Instead of following your natural socket, apply your transition and crease shades slightly above it, onto the lower part of the brow bone. This ensures the color is visible when your eyes are open, creating the illusion of depth and lifting the entire eye area. Our eye makeup is perfect for building this soft, visible definition.
Over-Blending and Creating Muddy Colors
Enthusiastic blending is great, but on hooded eyes, it can quickly lead to muddy, undefined color. With less visible lid space, you don’t have as much room for a wide gradient. Over-blending can cause all the shades to merge into one lackluster color, erasing the dimension you were trying to create.
Instead of blending in big, sweeping motions, use smaller, more controlled movements. Focus on softly diffusing the edges where two colors meet rather than mixing them together. Place your crease shade deliberately just above your natural crease and blend with precision. This keeps each color distinct and your look clean and defined. Using the right brushes will give you the control you need to perfect this technique.
Applying Too Much Product
It can be tempting to pack on dark eyeshadow to create drama, but this often has the opposite effect on hooded eyes. Applying heavy, dark shades all over the lid can make the eyes look smaller and more closed off. Because the lid space is already limited, a dark wash of color can feel overwhelming and weigh the eye down.
The key is to build your color gradually. Start with a light layer of product and add more only where you need it, like the outer corner. This gives you complete control and ensures you’re creating definition without adding weight. A more subtle approach enhances your natural eye shape beautifully. If you’re unsure how much product to use, a virtual beauty consultation can offer personalized guidance.
Pro Tips to Enhance Your Hooded Eyes
Once you’ve mastered the basic application, a few extra tricks can make a world of difference. These tips use light and shadow to your advantage, creating an open, lifted look that feels effortless. Think of them as the finishing touches that refine your technique and help you get the most out of your matte eyeshadows.
Brighten the Inner Corner
A touch of brightness in the right spot can instantly make your eyes look bigger and more awake. For hooded eyes, matte eyeshadows are your friend, especially neutral tones of beiges and browns that add natural brightness without any distracting shimmer. Using a small, soft brush, apply a light, creamy matte shade to the inner corner of your eye, near the tear duct. You can also sweep a little of this same color just below the arch of your eyebrow. This simple step catches the light and creates a subtle lift, drawing attention upward for a fresh, wide-eyed look.
Add Dimension with Strategic Placement
Creating depth is key to defining hooded eyes, and it’s all about where you place your color. Keeping depth focused on the outer corners helps maintain an open, lifted appearance. Using a small, dense brush, apply a medium-to-dark matte shadow to the outer third of your eye in a soft "V" shape. The most important part is to apply colors above the crease to lift the eye, ensuring the definition is visible when your eyes are open. This placement creates the illusion of a higher crease, giving your eyes a beautiful shape. Our collection of eye makeup has the perfect matte shades for this technique.
Take Your Look From Day to Night
Transitioning your makeup for an evening out doesn't have to be complicated. With hooded eyes, the goal is to add intensity without weighing them down, so avoid heavy dark shades across the entire lid. Instead, build upon your daytime look by adding a deeper matte shadow to the outer corner, blending it upward. For a quicker approach, apply a single shadow shade above the crease, then use the residual product on your brush to sweep across the lid and lower lash line. A thin swipe of eyeliner very close to your lashes can also add definition without closing off the eye, keeping the look sophisticated.
Finish the Look: Liner and Mascara Tips
Once your matte eyeshadow is perfectly blended, the right eyeliner and mascara techniques are the finishing touches that truly make your eyes pop. For those of us with hooded eyes, this final step is less about following standard rules and more about strategic application. The goal is always to create lift and definition without closing off the eye or losing that beautiful shadow work you just did. Think of liner and mascara as the support system for your eyeshadow, helping to open up your gaze and complete the look with polish and precision. Let's get into a few simple tricks that make a huge difference.
Where to Place Your Eyeliner
When it comes to eyeliner, placement is everything. A common mistake is drawing a thick line all the way across the lid, which can make hooded eyes appear smaller. Instead, keep the focus on the outer corners to maintain that open, lifted look. For subtle definition that won't eat up your lid space, try tightlining. This just means applying a soft pencil, like our Envieyed Eyeliner, to your upper waterline. It defines the lash line from below, making your lashes look fuller without a visible line on top. If you love a classic wing, draw it from the very outer corner of your eye, angling it upward toward the tail of your brow to help lengthen and lift.
How to Apply Mascara for Extra Lift
Mascara is your best friend for faking a wide-awake look. The key is to create as much upward lift as possible to counteract the natural hood of the lid. Before you even open your mascara tube, give your lashes a really good curl, focusing on the base to get maximum lift. Then, apply a few generous coats of a defining mascara, wiggling the wand from the root to the tip. Our Lash Envie Defining Mascara is perfect for separating and lifting each lash without clumping. For extra flair, you can even add a few individual false lashes to the outer corners to enhance that lifted, cat-eye effect without the weight of a full strip.
Related Articles
- 8 Pro Eyeshadow Tips for Hooded Mature Eyes – Nude Envie
- Simple Makeup for Older Hooded Eyes: 5-Step Guide | Nude Envie
Frequently Asked Questions
Can I still wear shimmer eyeshadow with hooded eyes? Absolutely! While matte shadows are best for creating that new, lifted crease, you don't have to give up shimmer entirely. The secret is strategic placement. Use your matte shades to build the shape and definition above your natural crease. Then, you can press a small amount of a shimmery or satin shadow right onto the center of your mobile lid (the part that's visible when you look down). This adds a beautiful pop of light without highlighting the hooded area.
My eyeshadow always transfers to my upper lid. How can I stop this? This is a classic hooded eye challenge, and the solution is almost always a good eyeshadow primer. Primer creates a slightly tacky, smooth surface that grips onto your eyeshadow, preventing it from moving, creasing, or transferring as your eyelid folds. Apply a thin layer from your lash line all the way up to your brow bone and let it set for a minute before you start with your shadows. It truly makes all the difference in the longevity of your look.
What's the best way to apply eyeliner so it doesn't disappear or look crooked? With hooded eyes, a thick line of eyeliner can easily get lost in the fold or take up all your visible lid space. For a clean, defined look, try tightlining, which means applying your eyeliner pencil to the upper waterline, right under your lashes. This makes your lash base look fuller without drawing a line on your lid. If you love a wing, keep it thin and start it from the very outer corner, angling it up toward the tail of your brow.
How do I find my "new crease" without making it look unnatural? This can feel tricky at first, but it's simpler than it sounds. Look straight into a mirror with your eyes relaxed and open. Your "new crease" is the area just above your natural socket that is still visible. Start with a soft, neutral matte shadow on a fluffy brush and gently apply the color there, building it up slowly. The key is to blend the edges well so it looks like a soft, natural shadow, not a harsh line.
What kind of brushes are absolutely essential for this technique? You don't need a huge collection, but a few key brushes will give you the control you need. I recommend starting with three: a fluffy blending brush for diffusing color and softening edges, a smaller, flatter brush for placing color precisely on the lid, and a small pencil brush. The pencil brush is perfect for detailed work, like adding definition to the outer corner or smudging shadow along the lash line.